NAMI Southern AZ Mental Health Walk 2015

I am so glad I had the opportunity to volunteer at this year’s National Alliance on Mental Illness (NAMI) Southern Arizona Mental Health Walk. This is an annual community event to raise funds and awareness. As you know, I publish mental health-related blog posts from time to time. So many participants out this year doing the 3 or 5K. Some walk and raise funds as a team, others come by themselves, and many join friends and family. Fortunately, the walkers crossed the finish way before the temps reached into the 90’s. It was a hot one! I had a chance to see many old friends (as I often do at health events), so it made my day really special. It’s one of the best things in the world: being around a group of caring, non-judgmental people.

This year, walkers were warmed up with high-energy Latin dance aerobics and later treated to a post-walk Mariachi performance. It was a really fun time! NAMI hosts walks all across the U.S., so you may want to search for one in your area (if this is a cause you would like to support). I didn’t take a ton of pics this year, but here are a few:

image
Getting ready for the big walk! Many teams design and wear their own t-shirts.

image

image
Cafe 54 Food Truck serving hungry walkers (read more about their amazing work here).

image
Mariachi! I always love the outfits! They were awesome!

image
NAMI Store Tent

This banner from the Community Partnership of Southern Arizona really touched me. No shame, no fear, just help.
image

If you have a moment, please take a look at my mental health series posts. They can be found under the Health category of my blog menu. For your convenience, I have linked to them below. In addition to the blog posts themselves, I have listed many article and resources links. Further articles are frequently featured in My Way posts as well.

Mental Illness Discrimination & Exploitation

World Mental Health Day, 2014 & NAMI Multicultural Action Center

Mental Illness Awareness Week, Mental Illness Facts and Myths, & Cafe 54, Tucson, AZ

What is Stigma?

NAMI: National Alliance on Mental Illness Stigma Alerts Archive (many of these archives are no longer listed, so I may post a few at some point)

University of Arizona Camp Wellness

DIY Drop Earrings

DIY Drop Earrings | thelittlefashion-box.blogspot.com.
image

I must say that small studs are my normal earrings of choice. They fit my simple lifestyle well. But, on the odd occasion (or special occasions), I opt for bigger, bolder pieces. I think these drop earrings are a great project for beginning handmade jewelry makers. And, depending on the size, beads, colors, etc., used, they can be subtle, elegant, glam, statement….whatever suits you. If you have odd beads around, you may consider upcycling them for this type of earring. Or, perhaps you could even use dried beans, like those gorgeous necklaces I posted from Native Seeds/SEARCH. I think children would really enjoy that (with tool supervision, of course).

Great pic tutorial, so take a look at how easy it is! (Instructions unit conversion side note: 2 cm is a little over 3/4 of an inch).

WhirlwinDISH 27

Hope you’re having a fab day! The mini sweet pepper WhirlwinDISH was inspired by a couple of things: fried, cream & cheddar cheese-filled jalapeño poppers and a church cafe chicken salad. I know that sounds funny, haha! As you can see, the sun was starting its descent when I snapped the pic. I did the best I could 🙂 . I’ve been thinking about poppers for several weeks. I am limiting my cheese portions, though, and I rarely fry anything at home. I saw these sweet mini peppers, and dreams of those spicy, rich, poppers came back. I thought, why not stuff these with what I have on hand, and leave them raw? What did I have on hand to fill them with?…well, my first thought was that hummus would be an easy, inexpensive, & delish option. Then, I remembered a simple chicken salad from a church cafe in Phoenix (it came with a side of sliced bell peppers). I don’t know how many times I ordered that, but it always hit the spot! No chicken in sight, though. I did have salmon, so I decided to sub it. The jalapeño was the stuffer instead of the stuffee for these 2 fillings: Raw Sweet Pepper Poppers Filled w/ Edamame-Jalapeño Hummus & Salmon Salad w/ Jalapeño Mayo.
image
The Hummus FillingРStandard hummus w/ these changes: I made a roasted pistachio butter vs. tahini for the 1/2 garbanzo, 1/2 edamame hummus. And, I added a little parsley for a bit of green, jalape̱o for a little kick. Totally simple.

The Salmon Salad Filling — Salmon with mayo & relish. Homemade extra-virgin olive oil mayo with egg, extra-virgin, chia seed powder, garlic powder, pinch of mustard, vinegar, s & p, jalapeño. When I started to drizzle in the oil, I thought I could use chia seed powder to thicken up the mixture. This allowed me to cut down the amount of oil used. The church cafe chicken salad didn’t have relish in it, but I decided to add some at the last minute. I diced up a few homemade sweet pickles.

I can’t believe how much I loved the mini peppers! They have a milder, sweeter flavor than when they are full grown. It’s hard to believe growing up I detested raw peppers and onion, lol! If you see any of these peppers when you are out and about, I encourage you to try filling them with whatever sounds good to you (if you are a pepper person, that is 😉 ).

image
Raw Tri-Color Cauliflower-Spinach Salad with Honey-Lemon Vinaigrette. Colorful cauliflower was calling for me to make a salad. I was just missing the purple variety! I had a little more light with these pics. I poured the dressing on after I took the pic and let it sit for a bit (while I checked off a few things on my “to-do” list.). This allowed the flavors to mingle for a while. Salad: tri-colored cauliflower (white, orange, and green), baby spinach, pistachios, red onion, dried cranberries, raisins, and mini red sweet peppers. Easy vin: lemon juice, extra-virgin olive oil, honey, shallots, garlic, s&p.

image
This simple, but super colorful dish made me so happy! Sometimes, you just need a bit of color to perk you up and brighten your day. Both dishes were very satisfying, without being overly heavy. I may consider them for the next potluck I’m invited to!

Have a great weekend!

Homemade Ketchup

A CUP OF JO: Homemade Ketchup | joannagoddard.blogspot.ca.
image

Who needs store-bought when you can DIY it? I love homemade ketchup when the Farmer’s Market ripe, juicy reds are in season. I grew my own tomatoes in NY, but haven’t attempted them here in the desert. If you love to preserve foods, make sure to jar up a few bottles of ketchup along with your jams and jellies!

Enjoy!

Alternative DIY Flower, Plant, Gardening Pots

Alternative Materials to Make Flower Pots | femside.com.
image

Re & up cycling time! Let’s put some of those odd objects in our homes to good use. I am trying to get better at my desert gardening skills…really I am. How is it that you can kill cactus??? lol! I love fresh herbs, so I at least try to have those around. The Arizona climate (HEAT!!!) is very particular, though, so I need to continue to learn what to do & when. I may try to start a few from seeds this year, but my better luck has come from Farmer’s Market plants. I still grown my sprouts, and perhaps I will attempt sunflower or buckwheat “greens/lettuces” soon.

Happy Planting!

My Way, No. 20

*If you’re new to my blog, you may want to read this for info on what ‘My Way’ posts are all about. 🙂 *

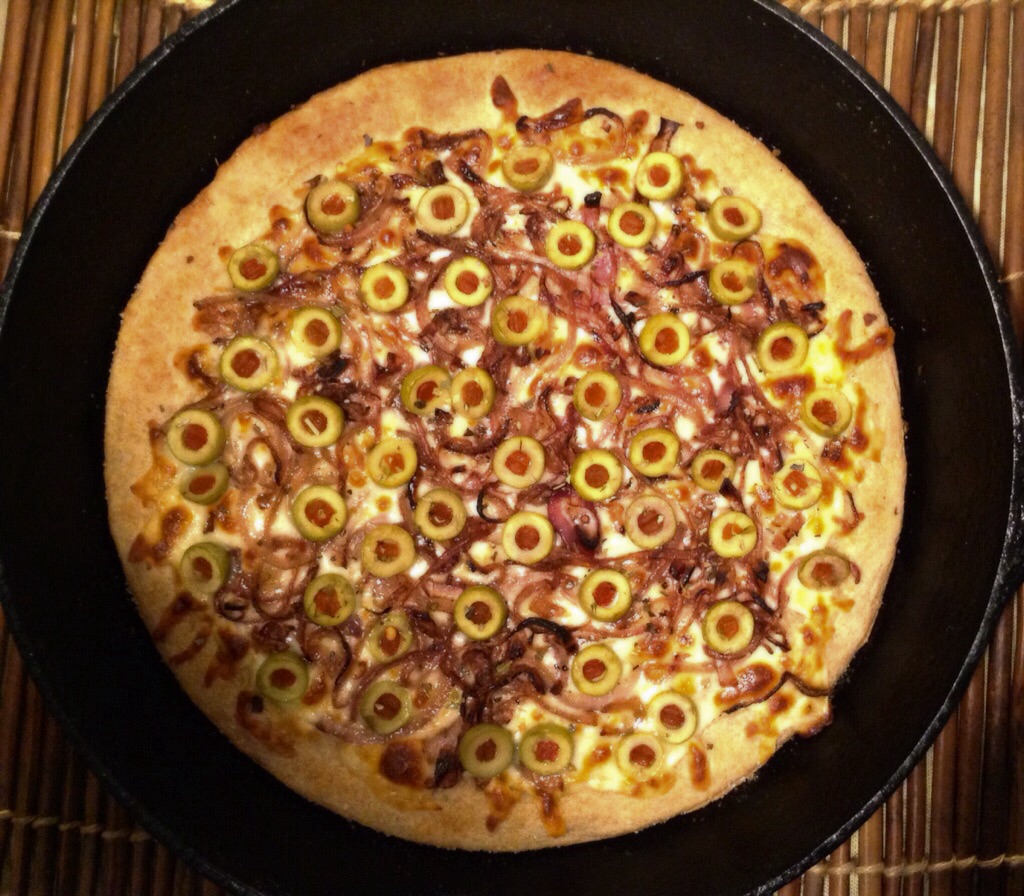
— I had a fab indulgence last week with the Fugazetta (Argentine Pizza) recipe. So tasty! The recipe calls for gobs and gobs of cheese, though, which I cannot have. I probably used less than a fourth of what it called for, but it was still quite delightful. I compromised with myself by tossing on a part-skim mozz vs. provolone. If I have dairy with any fat, I just have to limit my portions. Instead of a sheet pan, I made the Fugazetta in a 11.5 inch cast iron pan. My crust was probably a little thicker, but I absolutely loved it. It was pillowy-soft throughout and crispy on the bottom. I pushed the dough around the edges to make an even thicker crust around the rim. It reminded me of a thick-crust pizza from a restaurant in Texas. Even if it’s not my traditional NY-style, this familiarity brought me comfort. I just wished I had one of those neat-o Scizzas to cut it with! I had to make do with my boring pizza wheel. The instructions said to put the pan on the bottom rack to bake, but I was scared it would brown too quickly. My oven temp varies in different parts, so I thought it best to put it on the top rack. I let it go for 10 minutes, then gave it a hit under the broiler. I made a honey-whole wheat dough adapted from the original recipe. Toppings are just cheese (provolone or mozz), caramelized onions, green olives, oregano, and red pepper flakes, so it’s easy peasy. I added a bit of smoked salt (as I did when I made the sriracha-garlic knots) to give it a “brick-oven” appeal. I’m almost mad I found this recipe! You forget how much you love pizza until you have pizza again.
image

Most of the time, I use my food processor when making bread doughs. I find it to be fairly quick and easy. You just need to make sure your processor is big enough to handle the volume of dough you are making (and that you have a strong motor). Many of the recipes I come across are for stand mixers (or hand mixing/kneading), so I usually use this simple food processor method (for non-sourdough breads) instead:
1) In a warm area (usually the top of my stove while it’s warming up) add sweetener (honey, molasses, etc.) and warm water (whatever temp range is indicated on yeast packaging) to a bowl, stir until sweetener is dissolved; stir in yeast until dissolved and let the yeast activate. Mixture should be bubbly and foaming after several minutes (sometimes, recipes will indicate an allotted activation time). *You can stir all 3 at once, I just find it’s easier for me to get the sticky honey, etc. from the bottom of the bowl when I can see it a bit better (without the yeast).*
2) While the yeast is activating, in the food processor bowl fitted with the metal blade, add flour, vital wheat gluten or xanthan gum (if using), salt, and any other dry ingredients that are OK to be broken up into smaller pieces. (If I have ingredients I want to remain whole — perhaps raisins, nuts, candied peel, etc. — I will incorporate them after the wet ingredients have been added.) Pulse the dry ingredients for a bit (maybe a minute or less) until they are well combined.
3) When the yeast has activated, stir in any other liquid ingredients (eggs, oil, etc.).
4) Add the liquid ingredients to the food processor bowl, and pulse until the dough starts to come together. Some directions might tell you to slowly add the liquid through the chute, but I’ve never had a problem just putting it all in at the beginning. I want to see a recipe one day that says, “Do this fast, as fast as you possibly can!” lol. 😀 The dough will pull away from the sides, and I usually let it go for a bit longer (just to make sure the gluten is well developed). If the dough is too sticky, I add a little flour. Too dry, a little water.
5) If I’m adding any of those dry ingredients I mentioned in step 2, I add them at this stage. I may coat them with a little flour first, to keep them from sticking and/or bleeding. I tip the dough into a bowl, then incorporate them by hand. Otherwise, I just proceed to tip the dough into an oiled bowl, form it into a ball, Misto a little oil on top, and cover the bowl. I then follow the recipe instructions concerning rest periods, rise time(s), and shaping the dough.

This is the method I’ve used for years and years, and I’ve always been pleased with the results. Online, I found you can sub xanthan gum if you run out of vital wheat gluten (useful for doughs made without white flour). From what I’ve been reading, you should use 1/2 – 1 teaspoon of xanthan gum per 1 cup of flour (vs. 1 tablespoon of vital wheat gluten).

— Speaking of food processors, I am on the lookout for a new one soon. I have investigated several models, but haven’t completely made up my mind yet. I like this Cuisanart Elite 12-Cup model with a 1000-Watt Peak Motor | Cuisanart.com.
image
I’ve had good experiences with Cuisanart products in the past, so they were one of the first brands I scoped. A good processor (with a powerful motor) is an investment, for sure, but it’s a piece of equipment I use multiple times during the week. A quality processor will last for years and years. This one has a smaller work bowl, as well, so you get 2 for 1.

— The 2-Minute Green Spaghetti Sauce from the last ‘My Way’ post saved me quite a bit of time last week. I made batches of my standard ‘red’ the previous few weekends, so a change was in order. Totally simple, but I added a few things like garlic, chives, & hot pepper sauce. You just whizz it right up in the blender. I chose the option of nutritional yeast vs. parm & replaced the milk with the hot pasta water (my milk was frozen!). A couple of times, I added a bit of tinned salmon and finished with ground almonds — a quick and fab meal! I made another batch this past weekend. Make sure to check out the recipe if you get a minute.

— I am making another folding side table, this time a much easier version. I just spray painted the base of an old, beat up table, then staple gunned a DIY waterproof fabric to the top. I found a tip on another site: if your wax is a little white and streaky (from cooling) when applying the oil & wax mixture, use a blowdryer on the fabric for a bit. I tried this, and it worked beautifully. I have updated my How to Waterproof Fabric post with this tip.

— OK, so those are just temp pieces of furniture, not meant to stay up for any length of time — just a quick fold out, then up. But, I am trying to rethink a space to permanently store a few items. I really like this practical wooden boxes approach: DIY: VERSATILE USE OF WOODEN BOXES | Scandinavian Deko.
image

I have no idea what this says (as it’s in Spanish), but this looks like a fun place to be: Glamourosos y Coloridos Dormitorios de Niñas | Decoracion.IN.
image

— Love this article on How to Get Healthy Skin: A Natural Approach to Healthy Skin | DIYNatural.com.
image
“I’ve been asked over and over how old I am. I chuckle quietly to myself while someone tries to guess – often well below my actual age. I have good skin, and although I hit 51 last December, my skin is one of my best features. How do I do it? By using quite a few herbs and supplements that promote healthy, younger looking skin,” she says. Along with other types of oil, I like to use dabs of olive oil on my face (in certain spots) — fab for moisturizing the hair, as well. Also, if you haven’t done so already, check out my previous post: 10 Homemade Facial Scrubs.

— Cute iron-on appliques if you are not a machine sewer:
Hotfix Paris Eiffel Tower Applique Design for Fashion and Home Decor | Etsy.com | KBazaar.
image

— The Local First Arizona website gives a few tips on ‘keeping it local’ for upcoming graduations (they’ll be here before you know it!). If you’re in Tucson, we have SO many fine restaurants to celebrate at. Check out some of the pics under the Restaurants category of my blog menu.

— Today’s Nommy Treats:

One-Pan Jalapeño Kale & Roasted Garlic Egg Scramble | naturalchow.com.
image
Cold Sesame Coconut Noodle Salad | internationalrecipes.net.
image
Chocolate Garam Masala Truffles

Sea Bass in Coconut Cream

Pumpkinseed Butter Goji Cookies | Golubkakitchen.com.
image
Cherry Whiskey Smash | threadsence.com.
image
The Perfect Chinese Chicken Salad | toastytalk.com.
image

Well, I posted the whimsical Fish-Shaped Puff Pastry Entree, but have you ever made puff pastry from scratch? It’s easier than you think, more economical, and you can control the quality of the ingredients. If you can roll out pie crusts, tortillas, etc., then you can make puff pastry! It can take a bit of time, but it is well worth it. If you have little patience for the longer traditional French technique (the horror! lol), check out this quicker version: Homemade Puff Pastry ~ a quicker version | aflockinthecity.com.
image
Or, this: Quick Whole Wheat Puff Pastry | pinchandswirl.com.
image

Have a wonderful day, & I’ll see you next time!

Fish-Shaped Puff Pastry Entrée 

 image

 I have a very fuzzy recollection of assisting the catering of a bas mitvah way back in the day. I see brightly colored decorations and excited friends and family members. The one memory that sticks out to me more than others is a fish en croute dish that was prepared. I believe I had the recipe at one point, but it has gone missing over time. For the past several months, I have been on the lookout for something similar. I came across this fun ‘fish-shaped’ recipe and wanted to share it. It does not have the addition of a creamy cheese as my original did, but you could certainly add it. Great pictorial instructions, as well as a video.

Enjoy!

How to Waterproof Fabric

image

 I wrote a little about making my fabric table top waterproof last ‘My Way‘ post. Here is a great tutorial for waterproofing fabrics from coats, tents, backpacks, lunch bags, aprons (as illustrated in this blog post), to you name it. So easy, and it requires minimal ingredients: wax and a drying oil. This post uses linseed oil and beeswax to create a waterproof seal.

Information on drying oils can be found here and here. I also used a drying oil (soybean) for my floating shelf in this post. Drying Oils are fatty oils of vegetable matter that can react chemically with the oxygen in the air eventually to solidify and become dry to the touch. Nondrying oils are mineral oils and vegetable oils, such as peanut oil and cottonseed oil, that resemble animal fats and, because they do not oxidize naturally and harden, are unsuitable as a binder for paint.” trueartinfo.com.

“Drying oil is a kind of vegetable oil which drys in normal temperature. Linceed oil, Poppy oil, Walnut oil, Sunflower oil and Safflower oil are known as typical drying oil. Other kind of oils do not dry in normal temperature. Drying oil is the basic vehicle of oil paints. The more you incrude this oil into paints, the more the paints have transparensy and glossy. Drying oil can be increased its ablity by bleaching under the sun, heating to high temrelature or boiling. Bleached drying oil is called “Sun-Bleached oil” or “Sun-Thickened oil”. Heated one is called “Stand oil”. Water or Turpentine drys by vaporizing, but Drying oil drys by the oxidization. Drying oil insede of paints on a canvas starts to harden by taking in oxygen from the air. Drying oil reamin on the canvas and never vaporize. Drying oil bonds pigments, and provides glossy and transparensy proper to oil colour.” cad-red.com. 
Some oils dry faster than others, and some oils can also discolor your fabric. It’s probably best to apply the tin cloth mixture to a test section first. I used an old cloth to apply it vs. a paint brush. *Update 3/23/2015: I found a tip on another site: if your wax is a little white and streaky (from cooling) when applying the oil & wax mixture, use a blowdryer on the fabric for bit. I tried this, and it worked beautifully.* From this article, I learned that long ago, a combination of paraffin wax and turpentine was the most common waterproofing medium. I am sure people are still using that method today, in addition to using commercial products now available. Here’s an interesting piece on health risks associated with paraffin wax vs. soy wax (which you’ve probably heard over the past few years): Soy VS Paraffin. Much of the soy manufactured in the U.S. is genetically modified, though, so you may look into organic soy wax versions.
If you are not up to making your own tin cloth (and do not want a commercial oil/wax product), you can also use an iron-on vinyl, as is demonstrated in this post: DIY Waterproof Fabrics.
I hope these links give you a few suggestions if this is the kind of project you would like to take on. Now that my table is complete, I have a few more ideas in mind!